
Setting up a quiz in Absalon
This guide follows four steps in creating a quiz in Absalon. Depending on your need you can navigate to each of the four sections:
- Create Question Bank. If you do not have any questions prepared before.
- Add Questions to Question Bank. You you have created an empty question bank.
- Create Quiz from Question Bank. If you have not created a quiz but have a question bank with questions.
- Add Question to Quiz. If you have created an empty quiz and need to add questions.
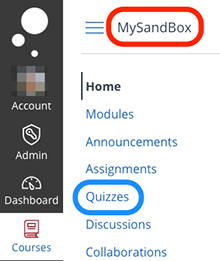
In all cases you need to navigate to the relevant course (red circle) and choose the option 'Quizzes' (red circle) in the course menu:
Create Question Bank
Before you can create a quiz, you need to create one or more Question Banks with questions.
- Locate the button with the three vertical dots on the right (red circle) and choose 'Manage Question Bank' (red arrow):

- Click on '+ Add Question Bank' in the right side (or below if you have a small screen):

- In the 'Bank Name' text field on the left fill in a relevant name for the question bank. This could be a theme or subject matter. This is particularly relevant if you in a quiz want to extract random questions within this theme or subject matter.
- Hit 'Enter' on the keyboard to assign the name.
Add Questions to Question Bank
- If you have just created a Question Bank, click on the bank name. If you are not in the Question Bank menu, see previous section on how to navigate to the list of Questions Banks.
- Click on '+ Add question' on the right side (or below if you have a small screen):

- In the text field at the top, designate a relevant name for the question (we suggest, that you include the overall theme in the question, e.g. 'Anatomy of the knee: ligaments'):

- You should keep the number of points for the questions to '1' (see image above).
- Multiple Choice: Question with one right answer.
- True/False: Question with answered with a 'True' or 'False'.
- Fill-in-the-Blank: The student writes one or more words in a blank text field. The answers are validated against the right answer(s). The student must write exactly what has been designated as the right answers. Thus, we recommend designating all acceptable spellings and forms of the word (singular/plural, dash/no-dash, US/UK spelling, etc.)
- Fill-in-Multiple-Blanks: Same as above but with several empty text fields.
- Multiple Answers: Same as 'Multiple Choice' but with multiple right answers.
- Multiple Dropdowns: One or more correct answer (e.g. in a sentence) must be chosen from a pre-defined drop down menu.
- Matching: A number of elements (words/sentences) must be matched with the right answer from a drop down menu. Note that if you want to use images, you need to show the images in the text field to the question and designate a number or a letter, which you the refer to in the question options.
- Numerical Answer: The student must designate a number (e.g. within an pre-defined acceptible range or precision).
- Formula Question: Creating your own question based on a mathematical formulars.
- Essay Question: The students fill in a text, which is not automatically validated by Absalon.
- File Upload Question: The students must upload a file, which is not validated by Absalon.Choose the type of question by clicking the drop down menu (see image above). In Absalon the following types of questions are possible:
You can find more information on the different types of questions and how to use them on the Canvas website.
Practical tips when adding questions
- Add new questions by clicking '+ Add question':
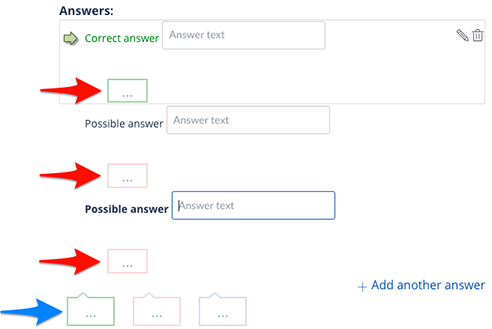
- When you add or remove answer options (e.g. in multiple choice questions), remember to designate the right answers by clicking the green arrow:

- Click the 'Update Question' button when you have edited a question:

- If you wish to add images in the question text, place the cursor where you wish to insert the image and follow this guide on how to add images. Note that this option does not apply to the 'Matching' questions type (see above).
- You can add an explanation/feedback to all question options by clicking the coloured boxes below the the answer (red arrows below). Alternatively, you can add a generic explanation/feedback to the questions by clicking the boxes below the questions (blue arrow below). Text in the red box is displayed for a wrong answer, text in the green box is displayed for a right answer, and text in the blue box is displayed no matter the answer:
Create Quiz from Question Bank
When you have added your questions in the Question Bank, you can create a quiz with questions from your Question Bank (and other Question Banks).
- In the 'Quizzes' menu (see screenshot above) click on the '+ Quiz' button on the left:

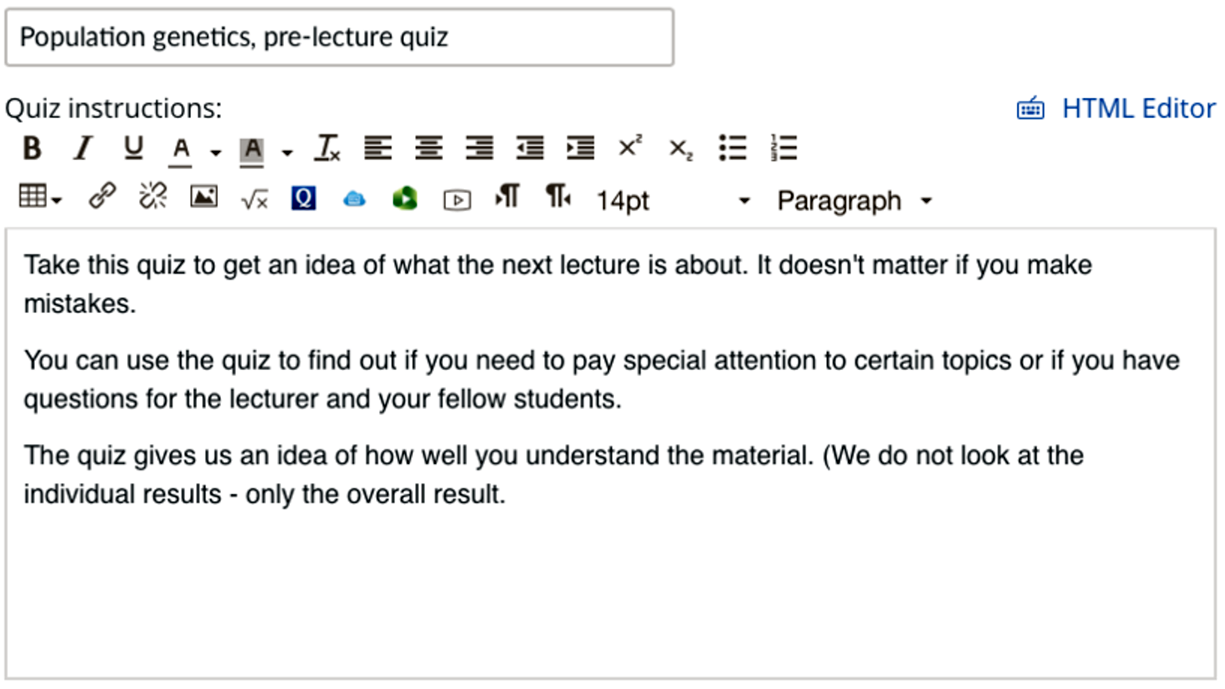
- Designate a meaningful name and an explanation about the quiz. See below for an example:
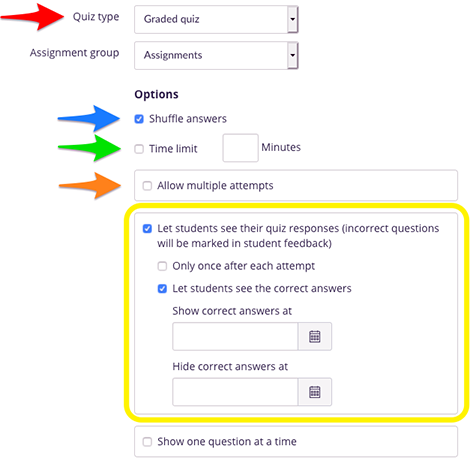
- We recommend using a Graded quiz (red arrow below) whether you use points or not. In a graded quiz, you can review the students answers and gain insights about the quiz and if adjustments either to the teaching or the quiz are warrented.
- If you mark Shuffle answers (blue arrow) the answer options where relevant is shuffled every time the questions are presented. This feature is set globally for all questions in the quiz.
- If relevant set a Time limit (green arrow) for the quiz
- Mark the Allow multiple attempts (orange arrow) if the students are allowed multiple attempts of the quiz.
- Set the options for viewing the corrects responses to the questions (yellow box)Set the relevant options for the quiz in the section:
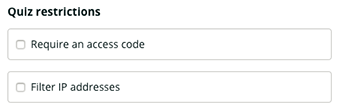
- Leave the Quiz restrictions options empty:
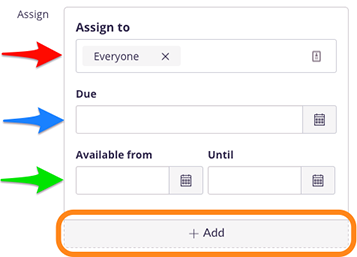
- In the Assign box you can choose:
- Assign to: Who should take the quiz (red arrow below). Default setting is all students ('Everyone'). If you have designated either sections or manually created groups you can choose these as well. Finally, you can choose individual students.
- Due: The deadline for taking the quiz (blue arrow).
- Available from... Until: The period where the quiz is available to the students in the Quizzes section (green arrow). If left empty the quiz will be available at all time.
- + Add: Add additional deadline sets if different sections/groups have different deadlines (orange box).
- Click Save and publish or Save (without publishing if you need to ad questions first):

Add Question to Quiz
Now you need to add questions to your quiz from the question banks.
- Find the quiz you just created. If you have just created the quiz, jump to 2. in this list. Otherwise you need to edit your quiz:
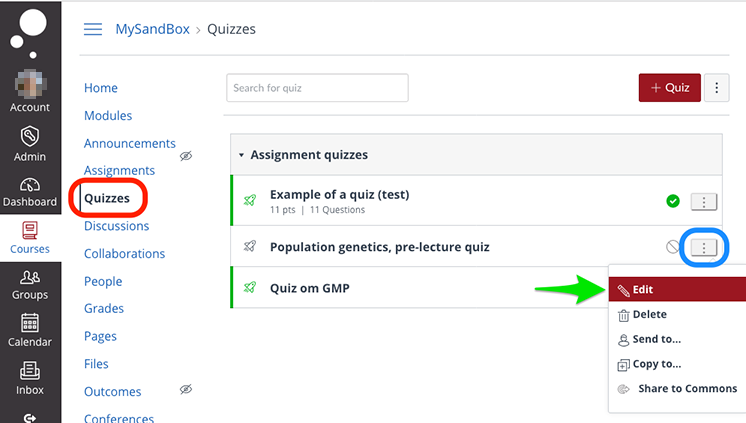
- Click 'Quizzes' in the course menu (red box below)
- Click on the three dots to the right of the quiz you want to edit (blue box).
- Click 'Edit' (green arrow)
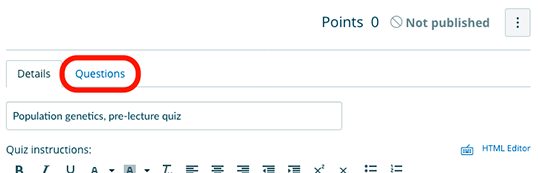
- Go to the 'Questions' tab:
- Select 'Find questions':

You have three options when adding questions (described below). All three options can be repeated if questions from other question banks needs to be included.
Option 1- Selected questions appear in the same order for all students.
- Click on your question bank (red box below)
- Check the boxes next to the questions you want to add to your quiz (blue arrow). If you want to select all the questions, click the 'Select All' link (green arrow).
- When you have selected all the questions you want to use, click the 'Add Questions' (orange box)

Option 2 - Selected questions appear in random order for all students
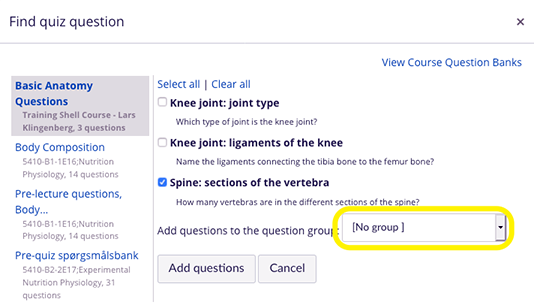
- Click on your question bank (red box above)
- Check the boxes next to the questions you want to add to your quiz (blue arrow). If you want to select all the questions, click the 'Select All' link (green arrow).
- Choose a new group under 'Add questions to the question group' (yellow box below):
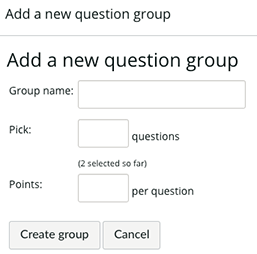
- Name the group and choose again how many questions that will be taken from the question bank - a selection or all questions. Points will be the same for all questions, but once the questions are in your quiz it is possible to change the weighting of points:
- Click 'Create group
- Click 'Add questions'
Option 3 - Questions appear in random order and differ from student to student
- Click on your question bank (red box above)
- Check the boxes next to the questions you want to add to your quiz (blue arrow). If you want to select all the questions, click the 'Select All' link (green arrow).
- Choose a new group under 'Add questions to the question group' (yellow box below):
- Name the group and choose how many questions that will be randomly picked from the question bank – a smaller number than your total amount of questions (see box above). Points will be the same for all questions, but once the questions are in your quiz it is possible to change the weighting of points.
- Click 'Create group
- Click 'Add questions'
Remember to save the quiz and publish it to course room, so the students have access to the quiz.